
If you’ve never seen the movie Analyze This, here’s the quick pitch: A member
of, let’s say, a New York family clan with questionable habits decides to
seriously considers therapy to improve his mental state. With Billy Crystal and
Robert De Niro driving the plot, hilarity is guaranteed. And while Analyze
This! satirically tackles issues of a caricatured MOB world, getting to the
root of problems with the right analytical tools is crucial everywhere. All the
more in a mission critical LOB-App world.
Enter the new WinForms Roslyn Analyzers, your domain-specific “counselor”
for WinForms applications. With .NET 9, we’re rolling out these analyzers to
help your code tackle its potential issues—whether it’s
buggy behavior, questionable patterns, or opportunities for improvement.
What Exactly is a Roslyn Analyzer?
Roslyn analyzers are a core part of the Roslyn compiler platform, seamlessly
working in the background to analyze your code as you write it. Chances are,
you’ve been using them for years without even realizing it. Many features in
Visual Studio, like code fixes, refactoring suggestions, and error diagnostics,
rely on or even just are Analyzers or CodeFixes to enhance your development
process. They’ve become such an integral part of modern development that we
often take them for granted as just “how things work”.

The coolest thing: This Roslyn based compiler platform is not a black box.
They provide an extremely rich API, and not only Microsoft’s Visual Studio IDE
or Compiler teams can create Analyzers. Everyone can. And that’s why WinForms
picked up on this technology to improve the WinForms coding experience.
It’s Just the Beginning — More to Come
With .NET 9 we’ve laid the foundational infrastructure for WinForms-specific
analyzers and introduced the first set of rules. These analyzers are designed
to address key areas like security, stability, and productivity. And while this
is just the start, we’re committed to expanding their scope in future releases,
with more rules and features on the horizon.
So, let’s take a real look of what we got with the first sets of Analyzers we’re
introducing for .NET 9:
Guidance for picking correct InvokeAsync Overloads
With .NET 9 we have introduced a series of new Async APIs for WinForms. This
blog
post
describes the new WinForms Async feature in detail. This is one of the first
areas where we felt that WinForms Analyzers can help a lot in preventing issues
with your Async code.
One challenge when working with the new Control.InvokeAsync API is selecting
the correct overload from the following options:
public async Task InvokeAsync(Action callback, CancellationToken cancellationToken = default)
public async Task<T> InvokeAsync<T>(Func<T> callback, CancellationToken cancellationToken = default)
public async Task InvokeAsync(Func<CancellationToken, ValueTask> callback, CancellationToken cancellationToken = default)
public async Task<T> InvokeAsync<T>(Func<CancellationToken, ValueTask<T>> callback, CancellationToken cancellationToken = default)
Each overload supports different combinations of synchronous and asynchronous
methods, with or without return values. The linked blog post provides
comprehensive background information on these APIs.
Selecting the wrong overload however can lead to unstable code paths in your
application. To mitigate this, we’ve implemented an analyzer to help developers
choose the most appropriate InvokeAsync overload for their specific use cases.
Here’s the potential issue: InvokeAsync can asynchronously invoke both
synchronous and asynchronous methods. For asynchronous methods, you might pass a
Func<Task>, and expect it to be awaited, but it will not. Func<T> is
exclusively for asynchronously invoking a synchronous called method – of which
Func<Task> is just an unfortunate special case.
So, in other words, the problem arises because InvokeAsync can accept any
Func<T>. But only Func<CancellationToken, ValueTask> is properly awaited by
the API. If you pass a Func<Task> without the correct signature—one that
doesn’t take a CancellationToken and return a ValueTask—it won’t be awaited.
This leads to a “fire-and-forget” scenario, where exceptions within the function
are not handled correctly. If such a function then later throws an exception, it
will may corrupt data or go so far as to even crash your entire application.
Take a look at the following scenario:
private async void StartButtonClick(object sender, EventArgs e)
{
   _btnStartStopWatch.Text = _btnStartStopWatch.Text != "Stop" ? "Stop" : "Start";

    await Task.Run(async () =>
    {
        while (true)
        {
            await this.InvokeAsync(UpdateUiAsync);
        }
   });

   // ****
   // The actual UI update method
   // ****
   async Task UpdateUiAsync()
   {
         _lblStopWatch.Text = $"{DateTime.Now:HH:mm:ss - fff}";
         await Task.Delay(20);
   }
}
This is a typical scenario, where the overload of InvokeAsync which is supposed
to just return something other than a task is accidentally used. But the
Analyzer is pointing that out:

So, being notified by this, it also becomes clear that we actually need to
introduce a cancellation token so we can gracefully end the running task, either
when the user clicks the button again or – which is more important – when the
Form actually gets closed. Otherwise, the Task would continue to run while the
Form gets disposed. And that would lead to a crash:
    private async void ButtonClick(object sender, EventArgs e)
    {
        if (_stopWatchToken.CanBeCanceled)
        {
            _btnStartStopWatch.Text = "Start";
            _stopWatchTokenSource.Cancel();
            _stopWatchTokenSource.Dispose();
            _stopWatchTokenSource = new CancellationTokenSource();
            _stopWatchToken = CancellationToken.None;

            return;
        }

        _stopWatchToken = _stopWatchTokenSource.Token;
        _btnStartStopWatch.Text = "Stop";

        await Task.Run(async () =>
        {
            while (true)
            {
                try
                {
                    await this.InvokeAsync(UpdateUiAsync, _stopWatchToken);
                }
                catch (TaskCanceledException)
                {
                    break;
                }
            }
        });

        // ****
        // The actual UI update method
        // ****
        async ValueTask UpdateUiAsync(CancellationToken cancellation)
        {
            _lblStopWatch.Text = $"{DateTime.Now:HH:mm:ss - fff}";
            await Task.Delay(20, cancellation);
        }
    }

    protected override void OnFormClosing(FormClosingEventArgs e)
    {
        base.OnFormClosing(e);
        _stopWatchTokenSource.Cancel();
    }
The analyzer addresses this by detecting incompatible usages of InvokeAsync and
guiding you to select the correct overload. This ensures stable, predictable
behavior and proper exception handling in your asynchronous code.
Preventing Leaks of Design-Time Business Data
When developing custom controls or business control logic classes derived from
UserControl, it’s common to manage its behavior and appearance using
properties. However, a common issue arises when these properties are
inadvertently set at design time. This typically happens because there is no
mechanism in place to guard against such conditions during the design phase.

If these properties are not properly configured to control their code serialization behavior, sensitive data set during design time may unintentionally leak into the generated code. Such leaks can result in:
- Sensitive data being exposed in source code, potentially published on platforms like GitHub.
- Design-time data being embedded into resource files, either because necessary
TypeConverters for the property type in question are missing, or when the form
is localized.
Both scenarios pose significant risks to the integrity and security of your
application.
Additionally, we aim to avoid resource serialization whenever possible. With
.NET 9, the Binary Formatter and related APIs have been phased
out
due to security and maintainability concerns. This makes it even more critical
to carefully control what data gets serialized and how.
The Binary Formatter was historically used to serialize objects, but it had
numerous security vulnerabilities that made it unsuitable for modern
applications. In .NET 9, we eliminated this serializer entirely to reduce attack
surfaces and improve the reliability of applications. Any reliance on resource
serialization has the potential to reintroduce these risks, so it is essential to adopt safer
practices.
To help you, the developer, address this issue, we’ve introduced a
WinForms-specific analyzer. This analyzer activates when all the following
mechanisms to control the CodeDOM serialization process for properties are
missing:
SerializationVisibilityAttribute: This attribute controls how (or if)
the CodeDOM serializers should serialize the content of a property.- The property is not read-only, as the CodeDOM serializer ignores
read-only properties by default. DefaultValueAttribute: This attribute defines the default value of a
property. If applied, the CodeDOM serializer only serializes the property
when the current value at design time differs from the default value.- A corresponding
private bool ShouldSerialize<PropertyName>()method is
not implemented. This method is called at design (serialization) time to
determine whether the property’s content should be serialized.
By ensuring at least one of these mechanisms is in place, you can avoid
unexpected serialization behavior and ensure that your properties are handled
correctly during the design-time CodeDOM serialization process.
But…this Analyzer broke my whole Solution!
So let’s say you’ve developed a domain-specific UserControl, like in the
screenshot above, in .NET 8. And now, you’re retargeting your project to .NET 9.
Well, obviously, at that moment, the analyzer kicks in, and you might see
something like this:

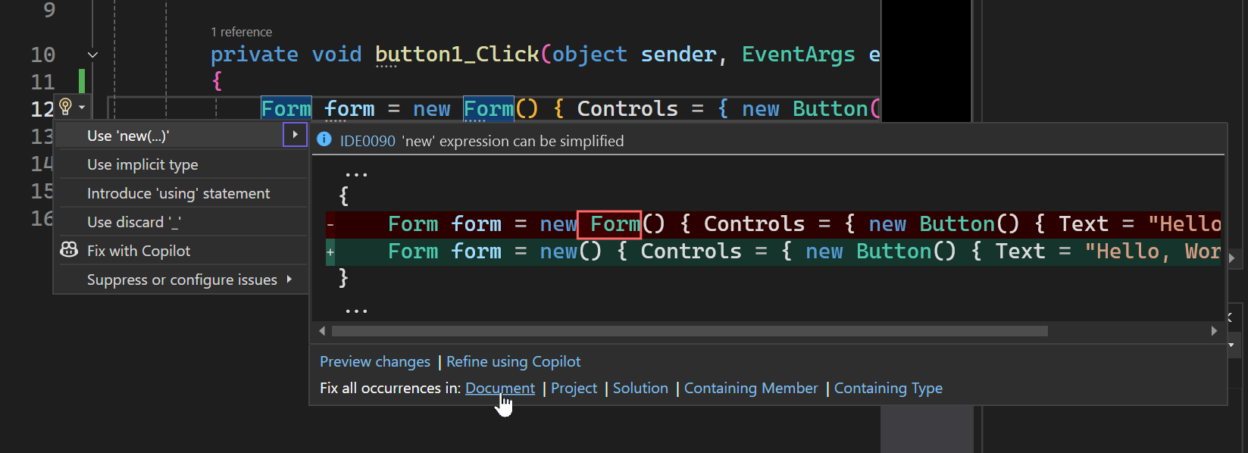
In contrast to the previously discussed Async Analyzer, this one has a Roslyn
CodeFix attached to it. If you want to address the issue by instructing the
CodeDOM serializer to unconditionally never serialize the property content,
you can use the CodeFix to make the necessary changes:

As you can see, you can even have them fixed in one go throughout the whole
document. In most cases, this is already the right thing to do: the analyzer
adds the SerializationVisibilityAttribute on top of each flagged property,
ensuring it won’t be serialized unintentionally, which is exactly what we want:
   .
   .
   .
    [DesignerSerializationVisibility(DesignerSerializationVisibility.Hidden)]
    public string NameText
    {
        get => textBoxName.Text;
        set => textBoxName.Text = value;
    }

    [DesignerSerializationVisibility(DesignerSerializationVisibility.Hidden)]
    public string EmailText
    {
        get => textBoxEmail.Text;
        set => textBoxEmail.Text = value;
    }

    [DesignerSerializationVisibility(DesignerSerializationVisibility.Hidden)]
    public string PhoneText
    {
        get => textBoxPhone.Text;
        set => textBoxPhone.Text = value;
    }
   .
   .
   .
Copilot to the rescue!
There is an even more efficient way to handle necessary edit-amendments for
property attributes. The question you might want to ask yourself is: if there
are no attributes applied at all to control certain aspects of the property,
does it make sense to not only ensure proper serialization guidance but also to
apply other design-time attributes?
But then again, would the effort required be even greater—or would it?
Well, what if we utilize Copilot to amend all relevant property attributes
that are really useful at design-time, like the DescriptionAttribute or the
CategoryAttribute? Let’s give it a try, like this:

Depending on the language model you picked for Copilot, you should see a result
where we not only resolve the issues the analyzer pointed out, but Copilot also
takes care of adding the remaining attributes that make sense in the context.
Copilot shows you the code it wants to add, and you can merge the suggested
changes with just one mouse click.

And those kind of issues are surely not the only area where Copilot can assist
you bigtime in the effort to modernize your existing WinForms applications.
But if the analyzer flagged hundreds of issues throughout your entire solution,
don’t panic! There are more options to configure the severity of an analyzer at
the code file, project, or even solution level:
Suppressing Analyzers Based on Scope
Firstly, you have the option to suppress the analyzer(s) on different scopes:
- In Source: This option inserts a #pragma warning disable directive
directly in the source file around the flagged code. This approach is useful
for localized, one-off suppressions where the analyzer warning is unnecessary
or irrelevant. For example:
#pragma warning disable WFO1000
public string SomeProperty { get; set; }
#pragma warning restore WFO1000- In Suppression File: This adds the suppression to a file named
GlobalSuppressions.cs in your project. Suppressions in this file are scoped
globally to the assembly or namespace, making it a good choice for
larger-scale suppressions. For example:
[assembly: System.Diagnostics.CodeAnalysis.SuppressMessage(
    "WinForms.Analyzers",
    "WFO1000",
Justification = "This property is intentionally serialized.")]- In Source via Attribute: This applies a suppression attribute directly to
a specific code element, such as a class or property. It’s a good option when
you want the suppression to remain part of the source code documentation. For
example:
[System.Diagnostics.CodeAnalysis.SuppressMessage(
    "WinForms.Analyzers",
    "WFO1000",
    Justification = "This property is handled manually.")]
public string SomeProperty { get; set; }
Configuring Analyzer Severity in .editorconfig
To configure analyzer severity centrally for your project or solution, you can
use an .editorconfig file. This file allows you to define rules for specific
analyzers, including their severity levels, such as none, suggestion, warning,
or error. For example, to change the severity of the WFO1000 analyzer:
# Configure the severity for the WFO1000 analyzer
dotnet_diagnostic.WFO1000.severity = warning
Using .editorconfig Files for Directory-Specific Settings
One of the powerful features of .editorconfig files is their ability to control
settings for different parts of a solution. By placing .editorconfig files in
different directories within the solution, you can apply settings only to
specific projects, folders, or files. The configuration applies hierarchically,
meaning that settings in a child directory’s .editorconfig file can override
those in parent directories.
For example:
- Root-level .editorconfig: Place a general .editorconfig file at the
solution root to define default settings that apply to the entire solution. - Project-specific .editorconfig: Place another .editorconfig file in the
directory of a specific project to apply different rules for that project while
inheriting settings from the root. - Folder-specific .editorconfig: If certain folders (e.g., test projects,
legacy code) require unique settings, you can add an .editorconfig file to those
folders to override the inherited configuration.
/solution-root
  ├── .editorconfig (applies to all projects)
  ├── ProjectA/
  │    ├── .editorconfig (overrides root settings for ProjectA)
  │    └── CodeFile.cs
  ├── ProjectB/
  │    ├── .editorconfig (specific to ProjectB)
  │    └── CodeFile.cs
  ├── Shared/
  │    ├── .editorconfig (applies to shared utilities)
  │    └── Utility.cs
In this layout, the .editorconfig at the root applies general settings to all
files in the solution. The .editorconfig inside ProjectA applies additional or
overriding rules specific to ProjectA. Similarly, ProjectB and Shared
directories can define their unique settings.
- Use Cases for Directory-Specific .editorconfig Files Test Projects:
Disable or lower the severity of certain analyzers for test projects, where some
rules may not be applicable.
# In TestProject/.editorconfig
dotnet_diagnostic.WFO1000.severity = none
Legacy Code: Suppress analyzers entirely or reduce their impact for legacy codebases to avoid unnecessary noise.
# In LegacyCode/.editorconfig
dotnet_diagnostic.WFO1000.severity = suggestion
Experimental Features: Use more lenient settings for projects under active development while enforcing stricter rules for production-ready code.By strategically placing .editorconfig files, you gain fine-grained control over
the behavior of analyzers and coding conventions, making it easier to manage
large solutions with diverse requirements. Remember, the goal of this analyzer
is to guide you toward more secure and maintainable code, but it’s up to you to
decide the best pace and priority for addressing these issues in your project.
As you can see: An .editorconfig file or a thoughtfully put set of such files
provides a centralized and consistent way to manage analyzer behavior across
your project or team.
For more details, refer to the .editorconfig
documentation.
So, I have good ideas for WinForms Analyzers – can I contribute?
Absolutely! The WinForms team and the community are always looking for ideas to
improve the developer experience. If you have suggestions for new analyzers or
enhancements to existing ones, here’s how you can contribute:
- Open an issue: Head over to the WinForms GitHub
repository and open an issue describing
your idea. Be as detailed as possible, explaining the problem your analyzer
would solve and how it could work. - Join discussions: Engage with the WinForms community on GitHub or other
forums. Feedback from other developers can help refine your idea. - Contribute code: If you’re familiar with the .NET Roslyn analyzer
framework, consider implementing your idea and submitting a pull request to
the repository. The team actively reviews and merges community contributions. - Test and iterate: Before submitting your pull request, thoroughly test
your analyzer with real-world scenarios to ensure it works as intended and
doesn’t introduce false positives.
Contributing to the ecosystem not only helps others but also deepens your
understanding of WinForms development and the .NET platform.
Final Words
Analyzers are powerful tools that help developers write better, more reliable,
and secure code. While they can initially seem intrusive—especially when they
flag many issues—they serve as a safety net, guiding you to avoid common
pitfalls and adopt best practices.
The new WinForms-specific analyzers are part of our ongoing effort to modernize
and secure the platform while maintaining its simplicity and ease of use.
Whether you’re working on legacy applications or building new ones, these tools
aim to make your development experience smoother.
If you encounter issues or have ideas for improvement, we’d love to hear from
you! WinForms has thrived for decades because of its passionate and dedicated
community, and your contributions ensure it continues to evolve and remain
relevant in today’s development landscape.
Happy coding!
The post WinForms: Analyze This (Me in Visual Basic) appeared first on .NET Blog.