This is a continuation of the blog Getting Started with DevOps and .NET MAUI showcasing how to build a .NET MAUI Library using DevOps. This blog uses a sample project made Mike Parker that shows how to use MSBuild files in NuGet packages. In this blog, the focus is on the GitHub Actions workflow to automate the building, packaging, and publishing of the sample .NET MAUI Library.
Overall Workflow Overview
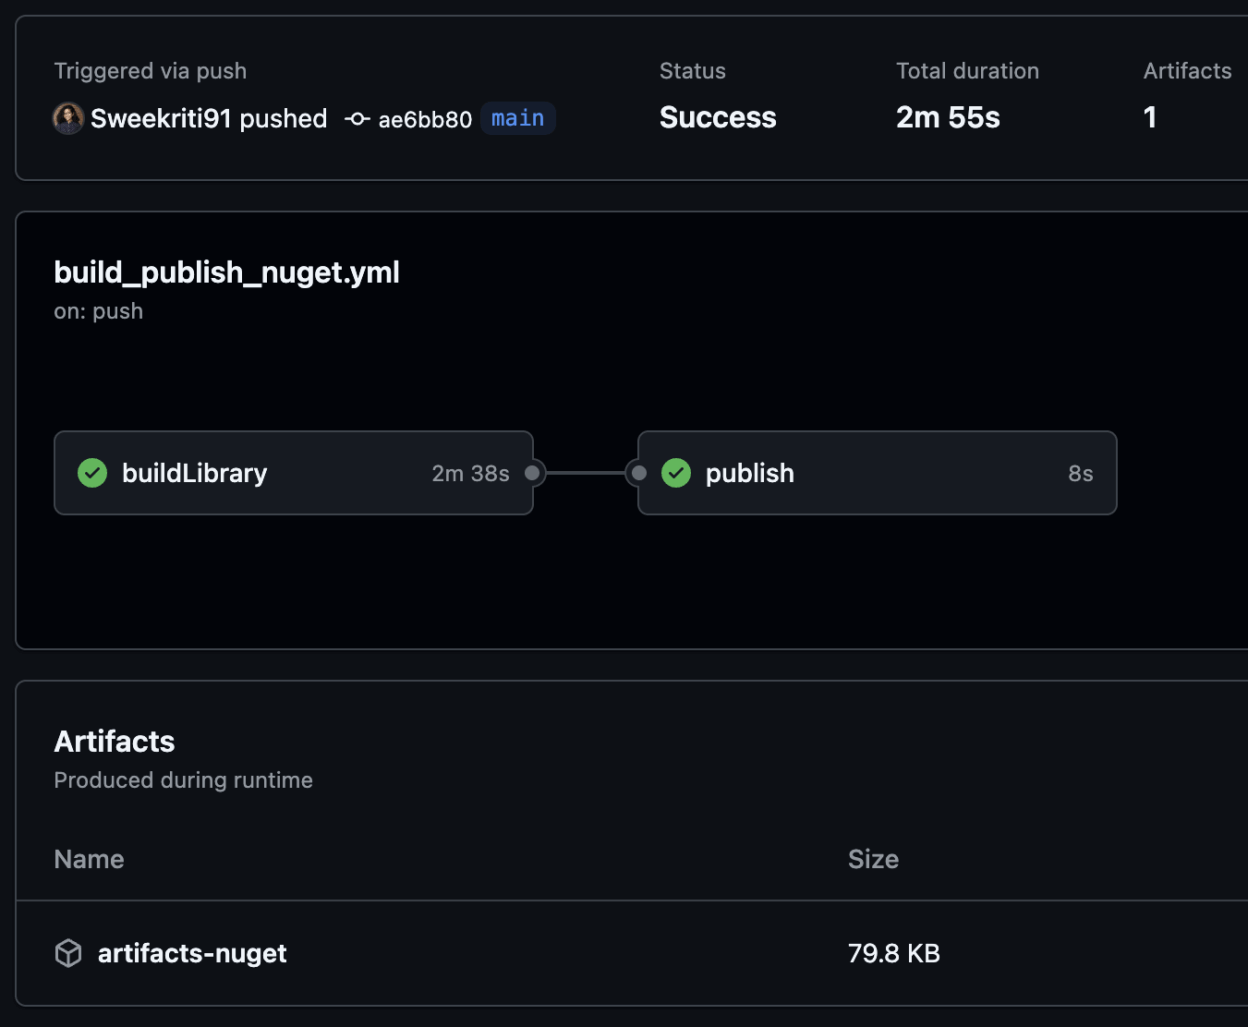
The build_publish_nuget.yml defines the end-to-end workflow for building and publishing the .NET MAUI Library NuGet Package. The versioning step handles versioning of the NuGet package for every build via GitHub Actions. The workflow consists of two main jobs: buildLibrary and publish. These jobs use dotnet commands to build and pack the .NET project. The publish job depends on the buildLibrary job completing successfully. Once you have created the NuGet package, we can push it to nuget.org (or an Azure DevOps Internal Feed).

Versioning of the NuGet Package
The versioning of the NuGet package is handled dynamically within the GitHub Actions workflow. The version is composed of the major version and the GitHub run ID, ensuring a unique version number for each workflow run.
Setting the Version
In the buildLibrary job, the VERSION variable is set using the MAJORVERSION environment variable and the GITHUB_RUN_ID:
- name: Set VERSION variable from tag
  run: |
    echo "VERSION=$MAJORVERSION-$GITHUB_RUN_ID" >> $GITHUB_ENV
This results in a version format like 1.0.0-1234, where 1.0.0 is the major version and 1234 is the GitHub run ID.
Using the Version
The VERSION variable is then used in the dotnet pack command to set the package version:
- name: Pack Library
  run: |
    dotnet pack <PATH TO PROJECT> -p:PackageVersion=$VERSION -c Release
This ensures that each NuGet package, built by the workflow, has a unique version preventing conflicts and making it easy to track and manage different builds.
Secure and Sign NuGet Package
A signed package allows for content integrity verification checks which provides protection against content tampering. The package signature also serves as the single source of truth about the actual origin of the package and help prove package authenticity for the consumer.
The NuGet Documentation provides detailed steps on how to sign the package along with how to get a signing certificate. To implement this step in the workflow, update the Pack Library step:
- name: Pack Library
  run: |
    dotnet pack <PATH TO PROJECT> -p:PackageVersion=$VERSION -c Release
    dotnet nuget sign MyPackage.nupkg --certificate-path <PathToTheCertificate> --timestamper <TimestampServiceURL>
The certificate can be added to GitHub Actions by following the deployment documentation.
Pushing to NuGet.org or Azure DevOps Internal Feed
The workflow sample shows how to create a GitHub Release and push to GitHub Actions artifacts as a basic use case. The workflow also includes steps for pushing the NuGet package to NuGet.org or Azure DevOps internal feed as well, based on your use case. Let’s look at how these steps can be customized to different use cases.
Pushing to NuGet.org
To push the package to NuGet.org, use the following steps in the publish job and add your NuGet API key:
- name: Push nuget to NuGet.org
  run: |
    dotnet nuget push <your_package_name>.nupkg -k ${{ secrets.NUGET_API_KEY }} -s https://api.nuget.org/v3/index.json --skip-duplicate
You can obtain the API key from your NuGet.org account. Make sure to set the NUGET_API_KEY secret variable in your GitHub repository’s secrets. The publish with nuget push documentation explains the other overrides available and provides troubleshooting steps for errors.
Pushing to Azure DevOps Internal Feed
To push the package to an Azure DevOps internal feed, use the following steps in the publish job and configure the feed URL and API key:
- name: Setup .NET Core
  uses: actions/setup-dotnet@v1
  with:
    dotnet-version: ${{ env.DOTNETVERSION }}
    source-url: ${{ env.AZURE_ARTIFACTS_FEED_URL }}
  env:
    NUGET_AUTH_TOKEN: ${{ secrets.AZURE_DEVOPS_TOKEN }}

- name: Push nuget to Azure DevOps Internal Feed
  run: |
    dotnet nuget push --api-key AzureArtifacts -s <your_package_name>.nupkg
Replace <AZURE_ARTIFACTS_FEED_URL> with the URL of your Azure Artifacts feed. Make sure to set the AZURE_DEVOPS_TOKEN secret variable in your GitHub repository’s secrets. The Azure Artifacts Documentation explains the how to get the AZURE_DEVOPS_TOKEN in detail.
Storing and Using Secret Values in GitHub Actions
To securely store and use sensitive information, such as API keys and tokens, in your GitHub Actions workflows you can use GitHub Secrets. Follow these steps to store and access secret values:
- Navigate to your repository on GitHub and click on the “Settings” tab.
- In the left sidebar, click on “Secrets and variables”, then click on “Actions”.
- Click the “New repository secret” button and add a new secret:
- Name: Enter a name for the secret (e.g.,
NUGET_API_KEY). - Value: Enter the secret value (e.g., your NuGet API key).
- Name: Enter a name for the secret (e.g.,
- Click the “Add secret” button.
Using Secrets in Workflows
Once you have added secrets to your repository, you can access them in your workflows using the ${{ secrets.SECRET_NAME }} syntax. For example:
- name: Push nuget to NuGet.org
  run: |
    dotnet nuget push **/*.nupkg -k ${{ secrets.NUGET_API_KEY }} -s https://api.nuget.org/v3/index.json --skip-duplicate
In this example, NUGET_API_KEY is the name of the secret that you added to your repository.
Create Release in GitHub
Another step in this Github workflow is setup to automatically create a GitHub Release from GitHub Actions. This can be done using the GitHub CLI and then, in this sample, we use the default settings of the task to implement a simple version of release note for each version released.
- name: Create Release and Upload Artifact to Release
  run: gh release create ${{env.VERSION_NUMBER}} -t ${{env.VERSION_NUMBER}} *.nupkg --generate-notes
In this sample, the syntax for the Release is to use the version number of the nuget package. We also opt to upload the NuGet package, generated at part of the Release, and also use the default --generate-notes command. This step is very customizable. For example, you can control triggers based on different tags and also make custom release notes. The GitHub CLI Release Create documentation explains these options in detail.
[!NOTE]
To use the GitHub CLI in GitHub Actions, we use an automatic secrets value for GITHUB_TOKEN providing thewrite-allpermission in order to generate the release notes.
Summary
This blog shows how to setup a basic GitHub Actions workflow to build and publish a .NET MAUI Library. It shows how to build, pack, and sign the NuGet package and, based on the use case, publish the package to NuGet.org, Azure DevOps Internal Feed, and create a GitHub Release. This basic workflow is customizable and can be extended to meet more complex requirements by following the linked documentation.
Check out the more samples at dotnet/maui-samples. Please let us know if anything is unclear or what you would like to see in follow up posts.
The post Packaging and Publishing a .NET MAUI Library with GitHub Actions appeared first on .NET Blog.